Wednesday, February 27, 2008

Baby Cards


Aren't' these just too sweet? I've seen several of these over on SCS and had to try one myself this morning. Very simple to make. Cut your cardstock the long way--4 1/4" x 11 and fold. Using your 1 3/8" round punch, punch a neck and two leg holes. I then added Scalloped circle punches on the pink one and 1 3/8" punches on the blue one along with strips of blue on the arms. Cutting the arms was just a guess thing--I just eyed it so far down and in about a 1/2" inch and then using a ruler (yes, a ruler I know, very technical) and made the slant from the 1/2" in slanted down to the top of the leg hole. Really very easy. I then scored lines on the arms and the crotch (can I say that on my blog? LOL) I added 3 eyelets using my very "cool" Crop-a-dile. Lastly I added "happy new baby" from For a Friend (new hostess set) and Sweet One from So Many Scallops (free Sale-a-bration set). Colors used were Pretty in Pink and Bashful Blue. If you have any more questions please feel free to email me.

Too Stinkin' Cute!


Well at least I think so. My sister Michele had received a box of candy from one of her clients for Christmas and it was in this cute purse shaped box (Russell Stover, I think) Of course she knew she had to give it to me after the candy was gone. It's been sitting here for awhile now and yesterday I decided that it was time to do something with it. I used the new Afternoon Tea DSP that will be available on March 1 to cover it. Then some more of the Styled Silver hodgepodge hardware. Notice the shape? Yep, you guessed it! It's the same shape as our Designer Label Punch. Now how cool is that? I just love how SU coordinates so many things to work together. The little flower is one from the Pretties Kit and I colored it using my Aquapainter pen and Groovy Guava ink pad and then added a silver brad along with some Double Stitched Ribbon in Groovy Guava and Wild Wasabi. Now the question. Do you think I'll look funny carrying this around town? LOL Really I think I'll make some matching note cards to go inside and if I can bring myself to do it I'll give it as a gift, but....................yeah you know me. LOL

Enjoy!
Renee

Tuesday, February 26, 2008

Carousel Notes


As most of you know the Occasions Mini catalog will go into effect on Saturday, March 1. I have a party on Saturday so I'm trying to get some samples made up using some of the new fun items that will be available in this new mini catalog. This card is made using the new Carousel Note Card in Wild Wasabi. These cards a just a single layer and they come with their own Chocolate Chip square envelope. The package comes in three colors Groovy Guave, Soft Sky and Wild Wasabi (4 of each color) and 12 Chocolate Chip envelopes that measure 6 1/4" x 6 1/4". These sell for $11.95. You can take this note card and layer it on a 6" square card if you'd like as well, but I think it will work nicely to just write a note on the back. The possibilites are endless.

I've also used the new Die-cut Blooms (available in the Occasions Mini as well) to make the flower. You get 4- 12 x 12 sheets (Bashful Blue, Old Olive, Pumpkin Pie and Real Red) and sell for $8.95. Oh, and did I mention these are made out of textured cardstock?

The Designer Paper is the new beautiful Afternoon Tea paper ($9.95). The brad in the middle of the flower is a brad from the new Hodgepodge Hardware, Styled Silver ($29.95). These brads have so much detail. You are gonna love 'em! These are both available in the new Occasions mini catalog as well.
Other items used were the level 1 hostess set For a Friend, Bashful Blue stripped ribbon and a Soft Subtle Bashful Blue Brad.

Before closing though I must mention that my inspiration for this card came from Patti LaPlante over on SCS. Thanks Patti.

Saturday, February 23, 2008

Just a quick post

Here's just a quick post today. I'm headed to my mom's to have a workshop this morning. My sister Carin is here for the weekend and she's hosting a SU workshop there since most of the people she knows that stamp live here. This is the hostess gift I made her. Hope she likes it and you do too.
Blessings,
Renee

As requested: the scalloped punched flowers in the box are peppermint patties covered with the scalloped flowers.

Tuesday, February 19, 2008

Ahhhhhhhhhhh Monday

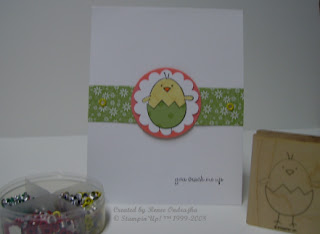
Oh it's not Monday, but it sure feels like it to me. I think I've got the winter blues, but where I live I guess there is not much one can do about it. I've been catching up on some paper work around here. Seems like a never ending process. Well enough of my woes. Here's a quick card I made to send to a customer along with her receipt for her SAB order. I just can't get enough of this little chick, but I'm sure you've probably noticed this by now. Hope you're not sick of him. Enjoy! (sorry it's a little blurry)
Renee

Thursday, February 14, 2008

Happy Valentine's Day!

I want to wish each of you a very Happy Valentine's Day. This card is the one I'm givning Frank today. I can show you now though because he doesn't even go on the computer let alone on the internet. He knows nothing of the things I show and tell you. Now don't you all feel special? *Ü* I used some of the new chunky glitter on this card that will making it's debut in the new Ocassions Mini catalog on March 1. The card base was a card that I had purchased on clearance in a multi-pack a couple of years ago with the idea of adding my own thing to them. I had a couple left and thought why not use them up. I made our girls cards too, but forget to take a pic. Maybe I can show you after they open them tonight. Well I better get going and finish my cupid work. Have a wonderful day!


Renee

Wednesday, February 13, 2008

Great New Hostess Special


There's a great new hostess special coming March 18 through April 30. Call me today and book your workshop and you will receive an EXTRA $25 in hostess rewards when your workshop totals $350 before tax and shipping. WOW!!! What a great deal! Hurry to book the date you want as I'm sure my calender will fill quickly. Don't delay!

Tuesday, February 12, 2008

Post It Note Keyring


I came across this awesome tutorial today by fellow demo Angie Kennedy Juda and just had to share. The cardstock is cut 3 1/4" x 2" and it is scored at 1 9/16" and 1 1/16". Punch your hole with the Crop-a-dile. Decorate as desired. So easy, but so cute. Guess who'll be receiving this one?

So, so sad.................

Ok, so last Friday I thought I had redeemed myself with some pretty good posts, but alas, I look to see if I have any comments on my posts and ...................(insert sigh here) nothing! So I say to myself, "is there really a need to post today?" Are you hearing the sadness in my voice? Ok, so I will leave you with this cute little Easter chick and..................................wait......

Friday, February 8, 2008

Friendship Blooms


Sale-a-bration is in full bloom and this card sure shows that. I cased this from fellow demo Jami Sibley. I just loved the colors and loved the fact that she used the Fusion Flowers on it along with the SAB set Friendship Blooms. The colors are just so vibrant and fun. Thanks Jami for a great card idea.
Enjoy!
Renee

Stamp set: Friendship Blooms (free with a $50 additional purchase) before March 17
Cardstock: Old Olive, Pink Passion, River Rock, Pumpkin Pie
Ink: Pink Passion, Old Olive, Pumpkin Pie, Pink Passion Stampin' Write Marker
Accessories: Mat Pack, Fusion Flowers, RR brads, Dimensionals

Peppermint Patty Duo


I've been wanting to try one of these since back before Christmas, but hadn't gotten around to it. Imagine that! Well today there was a challenge over on SCS and I thought I'd give it a try. The pattern came from Sonja Gonzalez. These are very easy to make. Hope you enjoy it. Now you give it a try.
Renee
Stamp set: Boho Backgrounds, Ink: Pale Plum, Perfect Plum, Cardstock: Pale Plum, Perfect Plum, Punches: 1 1/4", 1 3/8", scallop, Boho Blossom, 1/16" circle

Thursday, February 7, 2008

Good Egg Chicks

Well with a snow day and Brooke home to do all the housework--(you know I pick on her and make her do all the work around here, don't you?) I was able to get at a little more stamping today. Actually today is the first day I've felt like I might be getting over this flu bug I've had for over a week now. Anyway, if you see Brooke tell her what a good housekeeper she is.
Now back to stamping..........I was surfing SCS and came across this card made by dkessler73 and knew immediately I had to make this using the little sunglass embellishments I've been hoarding. LOL Besides that I had gotten this set over a week ago and haven't had a chance to play with it. The set is called "A Good Egg" and is available in the 2008 Spring and Summer Collection catalog for $20.95. Call me to order your set and you can be stampin' chicks soon.
Renee

Oh So Pretty!


Aren't the colors of this just "oh so pretty"? Well the girl too, but that goes without saying. *wink* I wanted to make this the minute I saw the sample on page 109 of the new catty. That Berry Bliss DSP is just the prettiest. Don't you think? I also used the new Fusion Flowers on page 177 . What are these you ask? They are high quality, custom-colored felt flowers. I layered them here with flowers I stamped with the One of a Kind flowers and punched out with the Boho Blossom flower punch. I added a clear rhinestone brad from the Pretties Kit to the centers. I know I used 4 brads on this project. That's a lot for a hoader such as myself. *grin* The little hinges I used were from Karen Foster and I purchased these at my local Ben Franklin. (plug for Gretchen & Heidi) The scallop circle was done with the SU scallop circle punch. How you may ask, it looks bigger? I will show you how with the following tutorial. I know you're impressed. I'm getting so "on the cutting edge". Pardon the pun! *Ü* Ok, I'm trying.....here goes.


Punch small (1 1/4") circle punch. Then around that hole you've made, punch a scallop circle
Cut the circle apart between two scallops. Now take and make small snips every 2 scallops. See next pic how it should look now.
Cut a circle using your round coluzzle circle template.
Put snail adhesive on the back and attach the scallops to your circle. I used the 4th circle on the coluzzle and I needed not quite 2 full scallop circles to go around the pink circle.
Here's the finished circle. Now no need to have scalloped circle punches in every size. Give it a try! Hope you enjoyed this.
Renee

LinkWithin

Related Posts with Thumbnails